Simple Origami Penguin for Beginners
This page contains our existing penguin diagram and written instructions. Please read the review note before starting.
- Difficulty
- Easy
- Allow about
- 10 minutes
- Recommended paper
- One square sheet of thin origami paper, about 15 × 15 cm (6 × 6 in).
Planning estimate; allow extra time for your first attempt.
Materials
- One square sheet of paper
- A flat folding surface
No scissors or glue needed. New to folding? Read the beginner’s guide.
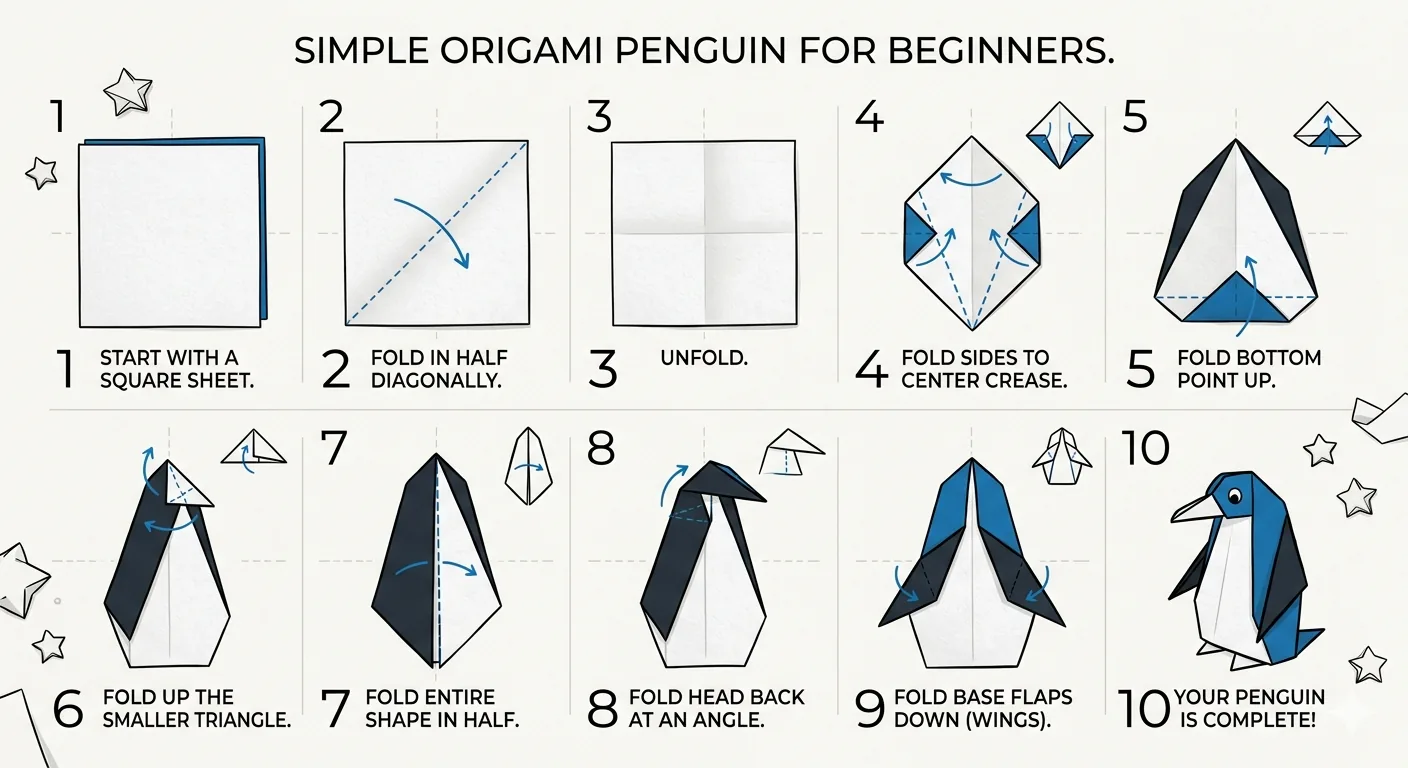
Step-by-step instructions
Start with a Square Sheet
Use a square piece of origami paper. If your paper is two-toned, start with the darker colour facing down — this will become the penguin's back.
Fold in Half Diagonally
Bring one corner up to meet the opposite corner, forming a triangle. Crease firmly along the fold, then unfold back to a flat square.
Unfold
Open the paper back out flat. You now have a diagonal crease running corner to corner.
Fold Both Sides to the Centre Crease
Fold the left and right corners inward so their edges meet along the diagonal crease in the centre. You should now have a kite shape.
Fold the Bottom Point Up
Take the bottom pointed tip and fold it upward so it meets roughly the centre of the shape. This creates the penguin's white belly area.
Fold Up the Smaller Triangle
Fold the small triangle at the top downward slightly — this will become the penguin's head. Leave a small white strip showing at the top for the face.
Fold the Entire Shape in Half
Fold the whole shape in half vertically (mountain fold), bringing the right side behind the left. The penguin's body shape should now be visible from the side.
Fold the Head Back at an Angle
Rotate the top portion (the head) forward at a slight angle using an inside reverse fold. This gives the penguin its characteristic tilted head and creates the beak.
Fold the Base Flaps Down (Wings)
On each side, fold the bottom corner flaps downward and outward to form the penguin's flippers/wings. Crease well so they hold their shape.
Your Penguin is Complete!
Stand your penguin upright. Give it a gentle squeeze at the base to help it balance. Add a dot with a pen for the eye and your origami penguin is done!
Helpful folding tips
- Line up corners before pressing a crease from the middle outwards.
- Keep the paper facing the same way as the instruction before each fold.
If a fold goes wrong
- If layers do not line up, return to the last clear step rather than forcing the next fold.
- Thick paper becomes difficult to fold as layers build up; try a larger, thinner square.